ECE5725 - Final Report
1. Header
Project Title: rpiCloud Private Cloud Storage Service
Date: May 21, 2021
Members: Haoran Cui, hc2223; Huaxiang Zeng, hz578
2. Objective
Nowadays, as the digital technique develops, it’s more and more important to take care of our information. Traditionally, people choose to use cloud drives on the Internet to store their documents. However, in traditional cloud drives, we are faced with many problems which annoy us for a long time. For example, the download speed is restricted. If we want to download some giant documents, it would waste us a lot of time. Besides, the memory size sometimes is limited and we can't store giant information. More seriously, sometimes our information inside the cloud drive may be disclosed, which damages our privacy. Some people may choose to buy a hard drive and carry it with their laptops. However, it’s not convenient and burdensome. For these reasons, we came up with a novel solution to design a faster, more convenient, and safer cloud drive based on Raspberry Pi and external drives. Also, we can access our cloud drive in local or international networks.
3. Project Video
4. Introduction
In our project, we use two external drives and one USB flash drive to serve as storage devices and one Raspberry Pi to be the server receiving and processing the users’ requests. In the external drives and USB flash drive, we can store our private files. Usually we do not have a public ip for our Raspberry Pi server, to make our system available through the internet, we use a technology called intranet penetration. With our new-designed cloud drive, we can treat it as the normal cloud drive just like Google drive or alibaba cloud drive. For example, we can list all our files and manage them. We can make a new folder in it and we also can delete useless files and folders. Besides, we can upload our file on our laptop anywhere. What’s important is we can download what we need from the cloud drive in any place at any time. One advantage of our system over traditional cloud storage service is that, if you want to have a faster download/upload speed, you can just eject your external drives from the Raspberry Pi and connect it to your laptop.
5. Design and Testing
5.1 Hardware
We use two hard drives and one USB flash drive as our storage devices and connect them to our Raspberry Pi. The hardware part is shown below:


5.2 Frontend
For the frontend, we used the React framework to create different components for the website. And developed handlers for different actions the user may take on our website. We also refer to the software Finder on MAC OSX to optimise our UI design and interaction logic.
The final result our website is shown as follow:

There are three main areas in our website: side navigation bar, tool button bar and main area. The side navigation bar will show all the devices connected to our Raspberry Pi. The tool button bar will show all the function buttons. You can see there are four buttons, that’s the four main functions that we have implemented. The main area will show the files and folders in the selected folders.
5.3 Backend
5.3.1 JDK installation
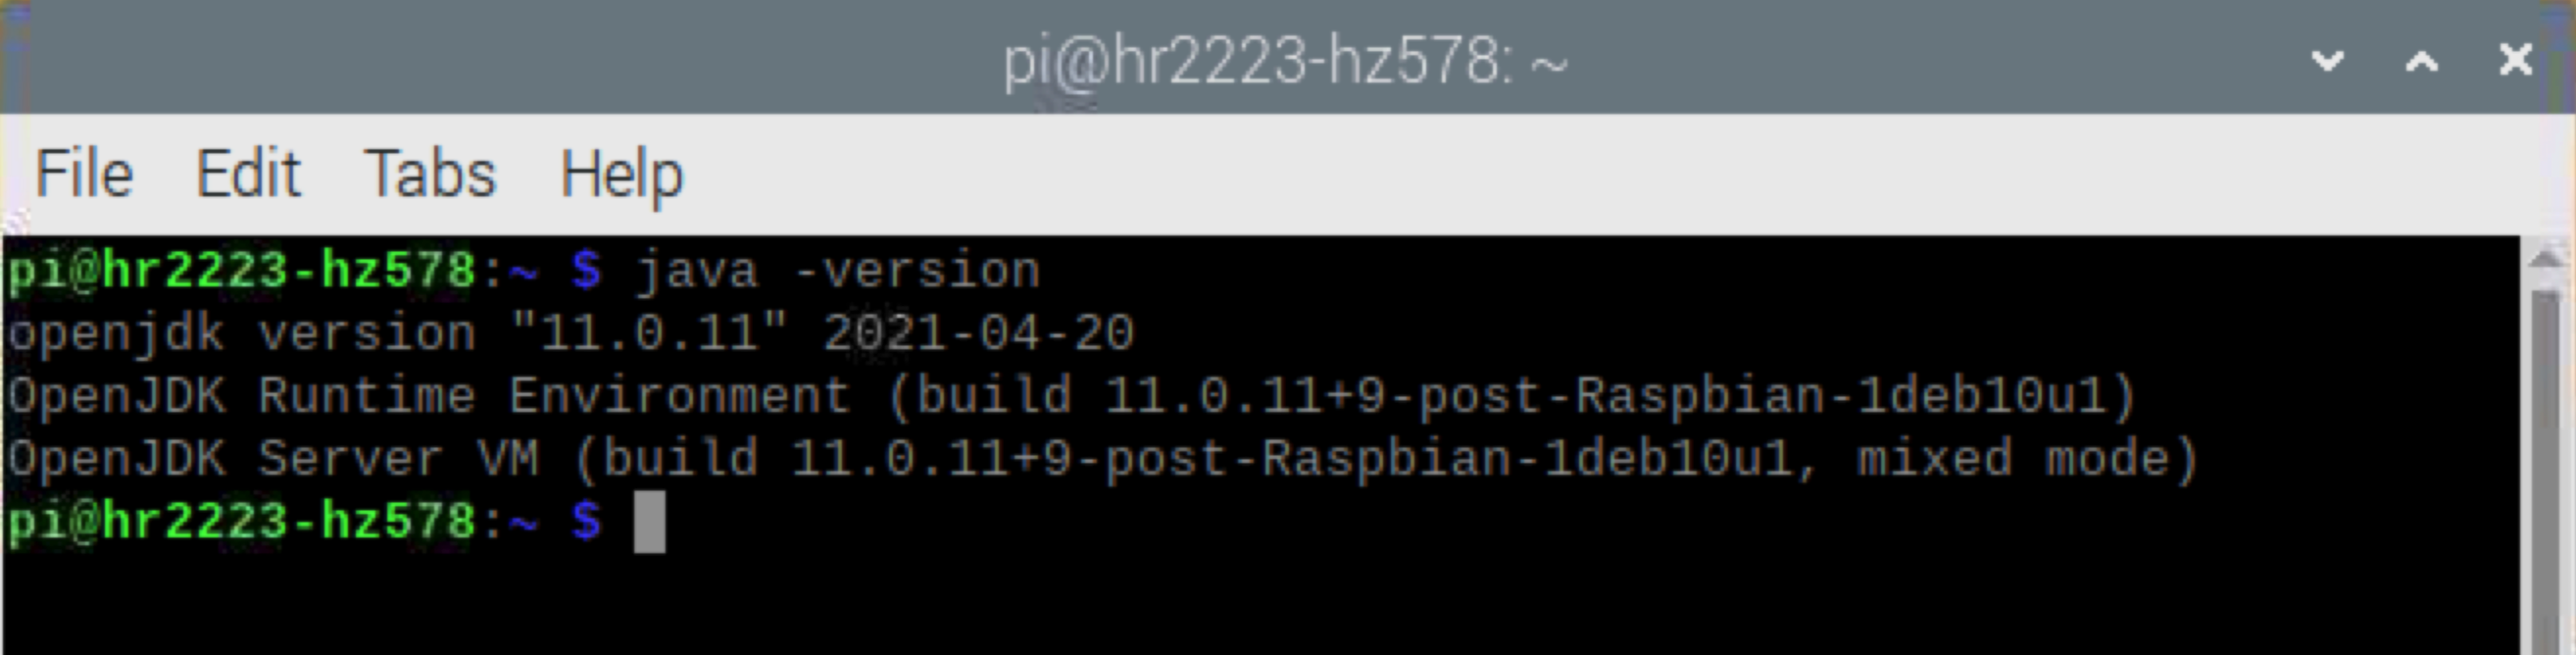
As for the front-end, we use Java Web to realize the interaction between the front-end and back-end. First, we need to deploy a web server in Raspberry Pi. After comparing several web servers, we decided to deploy a tomcat webserver in Raspberry Pi. Tomcat is friendly for new users because it’s easy to deploy and use. Before we deploy the tomcat, we need to install JDK in Raspberry Pi. We choose the default OpenJDK 11. For convenience, we use VNC to control our Raspberry Pi. To install the JDK, we need to type the command in the terminal as below sequentially:
sudo apt update
sudo apt install default-jdk
After that, the output will show as below:
openjdk version "11.0.5" 2019-10-15
OpenJDK Runtime Environment (build 11.0.5+10-post-Raspbian-1deb10u1)
OpenJDK Server VM (build 11.0.5+10-post-Raspbian-1deb10u1, mixed mode)
We can type java -version to check the Java version. In our Raspberry pi, the Java version is as below:
Moreover, we need to type sudo vim /etc/environment configure Java environment. In the last text, we inset one line:
JAVA_HOME="/usr/lib/jvm/java-11-openjdk-armhf/bin/java"Finally, we run the command source /etc/environment to reload the environment and we have finished the installation of JDK 11 in our Raspberry Pi.
5.3.2 tomcat installation
As for the tomcat server, in this case, our Raspberry Pi’s version is 4b and its kernel is Raspbian and we choose the tomcat 8 version. We install tomcat 8 from the website and put it into Raspberry Pi. The tomcat construction is seen below.

In the "lib" document, we can run the “start up.sh” file in the terminal to boot the tomcat. If the tomcat is successfully deployed, on the browser we type the URL localhost:8080 and it will show the result as in the picture below.

However, now we only can access our Java web project in our Raspberry Pi. We need to let our Raspberry Pi become an IOT device. So we need to expose our local network to the public network. To solve this problem, we use a technique called intranet penetration.
5.3.3 Java code explanation
Our Java code is easy to understand since we don't use any framework to build our project. And it's clear for the readers to fully comprehend what our code wants to express. Our code mainly composes of methods which extend HttpServlet Class. Generally, the methods consist of the following method:
@WebServlet(value = {"XXXServlet"} )
public class XXXServlet extends HttpServlet {
    protected void doPost(HttpServletRequest request, HttpServletResponse response) throws ServletException, IOException {

    }

    protected void doGet(HttpServletRequest request, HttpServletResponse response) throws ServletException, IOException {

    }
}
From the code above, we can see that Servlet Class can deal with request object, which need to use method GET or POST to send message. The difference between GET and POST method is that GET method transmits parameter after the URL divided by "/" and connected by notion "&". However, POST method transmits message in the body of HTTPS package. For this reason, GET method is considered a unsafe method while POST method is considered as a safe method. Besides, GET method's efficiency is higher than POST method. In our code, we send message with POST method in upload function, while send message with GET method in other functions. In doGET or doPost method, after we get the parameter, we use some Java inner class to deal with the cloud drive such as File Class or ZipOutputStream Class. What's more, the Java code will return a JSON to front-end and the front-end uses the JSON to process the result.
5.4 Intranet Penetration
We have compared with several software to realize this function and finally, we use cpolar to do this. Cpolar can establish a special, safe, and private channel between two devices. It can conquer the internet barrier and provide an easy way for us to access our cloud drive remotely.
In order to install cpolar in Raspberry Pi, we need to type the following command in terminal and then zip the file:
sudo wget /static/downloads/cpolar-stable-linux-arm.zip
sudo unzip cpolar-stable-linux-arm.zip
Using cpolar to access our cloud drive from outside the local network, we need to register an account on the cpolar website. The free version of cpolar allows us to access one port and each time we boot the cpolar, it will randomly establish a random URL. When we want to establish a connection with our cloud drive and share the address with the cloud drive, we need to use cpolar to establish a host address.
After we login in on cpolar website, we can get a unique auth-token secret key which contains a string with many characters on cpolar website. We need to type the following command in the terminal to preserve the unique auth-token string into default configuration file cpolar.xml.
./cpolar authtoken <my own auth-token secret key>And then we can access our Raspberry Pi from port 8080 and get a randomly-created URL with the following command:
./cpolar http 8080
As we can see the picture above, the Tunnel Statue is online, which means we can connect successfully. What’s more, we get a random URL in this case and in this case,
http://3a68154d.cpolar.ioWe can use both HTTP and HTTPS to access it. We type this URL in the Chrome browser on our laptop and the result is shown below:

In this case, it means we can use the randomly generated URL to access our cloud drive remotely.
After we successfully expose our intranet to a global network, we need to put our Java Web project war document into “webapps” (the red blank in the picture above). At the beginning, we build our war document on our laptop with IDEA and then use “scp” command to put it into the tomcat “webapps”. In IDEA, we also use JDK 11 because it’s the same as the JDK in our Raspberry Pi. After we boot the tomcat, the war file would be unzipped automatically.


After we put our war file into the webapps in tomcat, we have finished our project employment.
5.5 API Design
The backend and frontend are in RESTful style, the APIs are shown as follow.
get folders and files
/list?path=/home/pi
[
	{
		"type": "folder",
		"name": "fake_name_1",
		"path": "/home/pi/fake_name_1"
		"selected": 0
	},
	{
		"type": "file",
		"name": "fake_name_2",
		"path": "/home/pi/fake_name_2"
		"selected": 0
	}
]
create new directory
/makeDirectory?path=/home/pi{ "result": "create new folder: success" }
// or
{ "result": "create new folder: fail" }delete folder or file
/remove?path=/home/pi/test&type=folder
/remove?path=/home/pi/test&type=file
{ "result": "delete: success" }
// or
{ "result": "delete: fail" }upload folder or file
/upload?path=/home/pi
method: post
body: file
{ "result": "upload: success" }
// or
{ "result": "upload: fail" }download folder or file
/download?type=folder&path=/home/pi/ECE5725
/download?type=file&path=/home/pi/test.txt
{ "result": "upload: success" }
// or
{ "result": "upload: fail" }6. Result
6.1 Overview

From the picture above, you can see our website is in MAX OSX style. As we can see, the website can list all of the folders and files in our external drives. If there are too many folders or files, a scroll bar will appear in x axis or y axis when necessary. On the top right corner, there are four buttons. From the right to the left, the functions are sequential “delete a file or folder”, “create a new folder”, “ upload a file” and “download a file or folder”. In this case, we can control our hard drives remotely and we can treat it as a cloud drive.
6.2 Delete a file or folder
Now we randomly choose a file and click the delete button, and as we expect, the file would be deleted and the altered folder is shown below:


6.3 Create a new folder
Now we demonstrate the “create a new folder” part here. For example, if we want to create several new folders in test-foldet-1, we click the “make new folder” button several times. And we can see we successfully create 4 folders and their default names are untitled folder, untitled folder2, untitled folder3 and untitled folder4 sequentially.


6.4 Upload
The next part, we want to show the upload function. For example, if we want to upload a picture in report folder in test-folder-1, when we click the upload button, we can select what we want to upload in a panel. In this case, we select a picture of cat. And finally, we can upload a cat picture successfully.


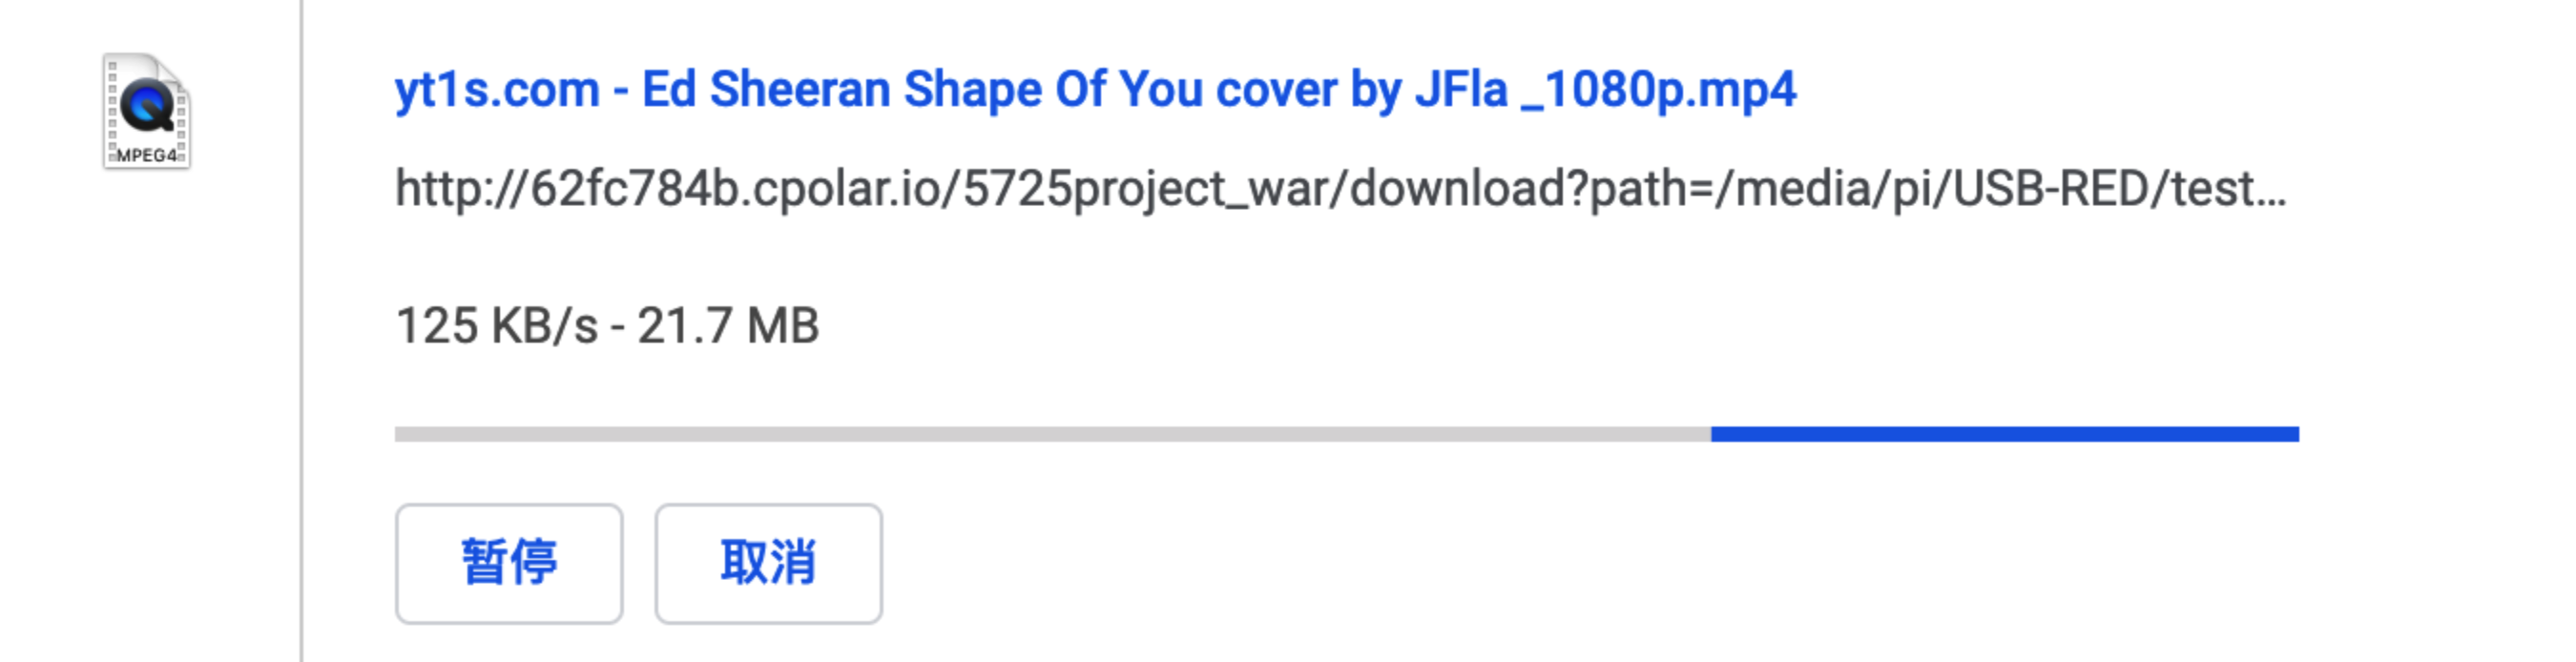
6.5 Download
The last demo we would like to show here is download function. We can download both a file or folder. If we choose a file, it will download the file directly. If we choose a folder, it will return a zip file of the folder we choose.


6.6 Download Speed Test
When downloading locally: 3 MB/s
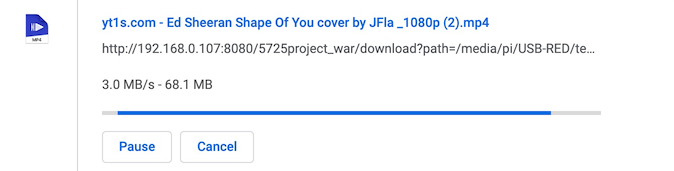
When downloading through internet in the United state: around 250 KB/s
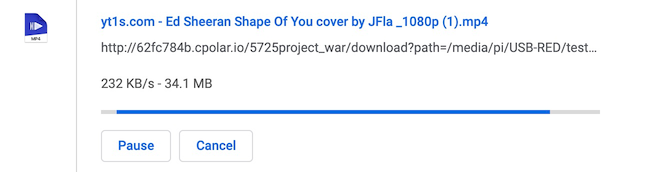
When downloading internationally: around 150 KB/s
7. Conclusions
From our result, we can conclude that we have successfully designed a convenient, useful cloud drive based on our Raspberry Pi and hard drives. We can successfully realize the four functions here. Totally, it can work well but there are some issues here. For example, sometimes it will not show the latest result until we refresh our website and we think we can improve it. What’s more, I think our functions are limited. To be more specific, we only contain download, upload, delete and make new folders. And we actually contain more functions in the future.
8. Future Work
In the future, I think we can add more functions in our project. For example, we can add a “copy and paste” function or “rename” function. What’s more, the delete function here is dangerous because it will delete all the documents forever and we think we can add a confirmation panel to choose if we want to delete surely. Besides, in our test, we only try at most three people to manage our cloud drive and we can try to make more and more people to manage our cloud drive at the same time.
9. Budget
1 * Raspberry Pi
1 * USB flash drive
2 * hard drive
10. References
[1]https://www.cpolar.com/blog/how-to-expose-intranet-servers-to-public-network-users
[2]https://dashboard.cpolar.com/get-started
[3] https://shumeipai.nxez.com/2021/01/20/how-to-install-java-jdk-on-raspberry-pi.html
11. Code Appendix
GitHub: https://github.com/Haoran-Cui/rpiCloud